Monday, September 3, 2012

Pam Bigelow's recipe for muffins

I've made this great recipe for muffins countless numbers of times.  Got the recipe from Pam Bigelow about 25 years ago....

Muffins (Pam Bigelow)
400 degrees, 15 minutes
Makes 12 full muffins

Sift into mixing bowl (or combine in a mixing bowl and thoroughly stir with a fork):

2 cups flour
3 teaspoons baking powder
½ teaspoon salt
½ cup sugar

Mix well in a 2-cup measuring cup:
1/3 cup melted butter (can use vegetable oil instead)
1 cup milk
1 egg

Pour over the flour mixture.  Stir only enough to dampen flour.  The batter should not be smooth.

Whole wheat – substitute ¾ cup whole wheat flour for 1 cup of white flour


Saturday, August 18, 2012

Chicken Kebob Bake

This is really good when you scewer it and put this on a grill. But, do I have a grill? No. So I improvise. I have to admit with this one though, that the improvising may not have been such a great idea. Maybe you could see the list and improve upon it? Or you could grill it, and be happy.

Chicken Kebob Bake, Adapted from Cooking Light July 2011.

Put in a plastic bag to marinate for 15 minutes
(I typically don't think a marinade is worth anything, but this one proved me wrong.)
1 TBSP brown sugar
Oil Olive
1 TBSP Fresh Lime Juice
A little bit o' pineapple juice
Chili Powder
Cumin
3 Garlic cloves, chopped
Black Pepper
Salt
Red Onipons
Chopped up chicken chunks
Red Bell Pepper, chopped into chunks

Take your marinade and put it in a glass pan. Bake at 350 for 45-55 minutes.

You can also add it to a skillet (I baked mine, and it was easy). Look at the easy!

Before....


I added my pineapple in the marinade, but I regret it now. I would suggest adding the pineapple after the chicken has baked. Or, you know, you could break out the mesquite and, well, you know...

This was so easy to clean, I think I cried a little! All you use is a knife, a cutting board, a plastic bag, and a glass pan. It has your veggies and fruits, and chicken.

You can also add a Nectarine Salsa to go with this, I suggest trying it:
1 Nectarine
1 Red Bell Pepper
1/4 Sliced Red Onion
1 avocado
Lime Juice
Salt
Red Pepper
*Cilantro* is optional, I'm not too crazy about it.

After!

Saturday, July 28, 2012

Restaurant Review: Ali Baba's Grill

Something new for the blog, a restaurant review! I recently went to Ali Baba's Grill with visiting family. Here is my short review:


Ali Baba's Gril
Golden, CO (Off of Highway 93)
Price: $-$$
We took a baby with us, so I'm assuming they are family friendly (?)
So much food! 


Pros1.
Great environment when I went. It's small and cozy. The decorations were very interesting and i enjoyed the atmosphere.
2. Big portions, I like to think that when I spend money, I get what I paid for.
3. The meat was good. The lamb Kebabs were well seasoned, soft, and very good. I also had chicken kebabs, which I thought were tender and tasty.
4. They had good rice.
5. They bring giant pitas to your table.

Cons
1. The falafel was too crunchy, well seasoned, but too crunchy.
2. The beef was okay. 
3. I wasn't overly impressed by their appetizers.

My final word is: I liked it and I would go again for the meat. You can try their appetizers and see what you think. I wouldn't suggest going unless you already knew you like this type of food, or you were truly willing to try something new.
I really enjoyed the Kebab Sampler

Thursday, July 26, 2012

Chicken Turnip Pie

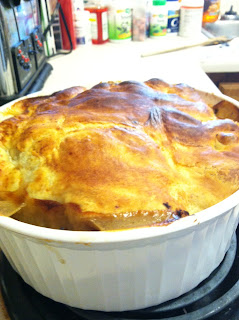
I have found a delicious success! Check it out in all it's glory:
Before Puff Pastry, BPP

Chicken Turnip Pie (Adapted from Cooking Light July 2012)

Maybe 5 pieces of cooked bacon, shredded into small bits.
Chicken,  shredded
Olive Oil
1 Red Onion, chopped
2 medium turnips, chopped
Carrots, chopped
1 Leek, chopped
Chicken Broth
Pepper
Peas or Corn

1 sheet of Puff pastry
2 eggs
1 Tbsp butter, melted
1 tbsp milk

1. In a pan, heat olive oil on medium high heat
2. Add carrots, turnips, and onions, let cook
3. Cook chicken until no longer pink
4. Add bacon and chopped leak
5. Add chicken broth
6. Once everything cooks and begins to become tender, add peas or corn
7. Put mixture into a larger casserole dish, or into individual servings.
8. Fold puff pastry sheet over dish, folding sides inside of dish.
9. In bowl, add eggs, butter, and milk. Whisk.
10. Take a brush and spread egg mixture onto puff pastry.
9. Back at 450 for 45 minutes, or until puff pastry is golden. Do not allow it to get too dark burn. It is then burned. See photo for example. Whoops.
This was in the oven a little too long.


Tuesday, July 17, 2012

Not Quite Gumbo Soup

I want to keep things simple, and that's why I avoid anything put together by Martha. I have prejudicely believed her to make many things take more time than I would like to devote to any one topic. I was taken aback, however, when I found a relatively easy looking recipe for Gumbo. So I tried to make it, and have ended up with something very different from the original.

Not Quite Gumbo Soup Recipe (Adapted from Martha Stewart's Living July 2010.)
Olive Oil
1 package Italian Turkey Sausage
Chicken
Celery
Green Onions, in abundance
2 Red Bell Peppers, diced
Chicken broth
15 OZ can Okra
3 bay leaves
28 Oz Diced Tomatoes with Juice
1 tsp cayenne pepper
1 tsp Worcestershire Sauce

1. Put big pot on stove, add Olive oil and turn on to medium high heat.
2. Add chicken and turkey. Cook until it is no longer pink.
3. Shred chicken.
4. Add green onions, celery, and diced red bell peppers, cook for a few minutes
5. Add chicken broth, okra, diced tomatoes, bay leaves and cayenne pepper. I allowed this to cook for a while.
6. I added Worcestershire Sauce at the end, stir it in well, and then allowed a few minutes more to cook.
7. Serve in bowls!
Very tasty! Not really sure it's Gumbo....

Also,  don't wait to take care of things of a medical nature. I had an implant placed in my jaw two years ago, forgot to take care of it, went back today, and found out I'm in for a world of hurt. The bone in my jaw grew and formed inside and over the impantn, the denist could not finish the job. Sigh, I'd like to say that I've learned my lesson, but I have a feeling it's going to get worse and I'm going to learn more before it's over.

Saturday, July 14, 2012

Chocolate Chip Contest!

If you ever buy exspensive chocolate, you might find yourself having the need to do a comparison of regular chocolates to reassure yourself that you made the right purchase. I did such a thing, with Jacque Torres chocolate recently, and I involved Rob and my mom in the final desicion, so I knew that I wouldn't be talking myself into believing something that wasn't true. Here are the brands tested:

The Contenders:
Nestle Toll House Bittersweet
Ghiradelli 60% Bittersweet
King Soupers Brand
Jacque Torres 60%
Hershey's Special Dark

Here are my personal Ratings:
5th Place: King Soupers Brand
4th Place: Ghiradelli 60%
3rd Place: Nestle Toll House

And now, for the winner of the Chocolate Chip Contest....
Jacque Torres! By a long shot! Making Hersey's Special Dark, to me, a surprise runner up! Rob agreed, and I think my mom did too, that Jacque Torres was smoother, creamier, and had a richer chocolate taste.

There you go, I'm not entirely crazy! Although, I bet after seeing my results, and seeing how I ranked some chocolates, maybe you think I am crazy...

Wednesday, July 11, 2012

Basil Chicken

I'm all about easy, and I really wasn't having any of this "Joy of Cooking" business.... so I stole this from a King Souper's Recipe:

Basil Pesto Chicken
Olive Oil
Salt
Pepper
Onions
1/4 Cup parsely
1/4 Cup Basil Pesto
A Whole Bunch o' Chicken

In a bowl, combine oil, salt, pepper, onions, parsely, and basil pesto. You can marinade the chicken for 15 minutes. The recipe said to grill it, but I don't have a grill, so I cooked it in a skillet. I turn the oven on, put the marinade in the skillet, and when I heard it start to cook, I threw the chicken in, making sure that the marinade got everywhere. I cooked it on both sides, cut up the chicken into cubes, and then cooked it further until their was no pink, only green pesto everywhere. That sounds like an evil plot, "No pink! Only green pesto everywhere, forever!"

I wish I had a grill, but this works!

Presto! Chicken! And then I added a side salad. That I got in a bag. From the grocery store. Wala!

I love salads covered in Blue Cheese Dressing. It's the real deal.

Strange and random confession, whenever I get home from work, I'm hungry and I need to eat. I typically use the first 30 minutes of coming home for eating on a bowl of cereal on the couch. Yesterday's choice was Rice Krispies, and I had to eat 3 bowls because that's the Cerealic Table of Conversion:

3 Bowls of Rice Krispies = 1 Bowl of Corn Chex
1 Bowl of Frosted Flakes = Very Hungry Me by Lunch
1 Bowl of Cap N' Crunch = Sacked out on the couch for 4 hours after immense sugar crash

Thursday, July 5, 2012

Chicken Fried Steak


Chicken Fried steak maybe one the easiest things on this planet to make and for whatever reason people are intimidated by it! But I don’t think there really is any reason to be. So here it is.
CHICKEN FRIED STEAK
Steaks- (I use a cube steak, it more or less looks like ground beef but it is a steak however, you can use whatever kind of steak makes you happy but you will want it rather thin and to tenderize it if you chose not to go with the cube steak.)
Eggs- my general rule of thumb is you will need about 1 egg per 2 steaks. You can always add more egg but no reason to waste it!
Tad bit of water! To mix in with the egg
You favorite choice of bread crumbs (options include and are not limited to… panko, regular bread crumbs, dried bread sent threw a food processor, saltine crackers mashed into bits, pretty much whatever you want to use for breading is fine as long as you like the taste and the texture it creates.)
Butter
Oil
A hot skillet

So let us Begin!
First you are going to preheat your skillet to a fairly hot temperature about 300-350. I have made this before on both a stove top and an electric skillet, I like the electric just a bit better because mine is bigger but that is more or less the only reason.  Once your skillet is preheated add the butter and the oil, equal parts of butter to oil I start with about 2 tablespoons of each and if I need more I just add it as I need it! You want a good coating across the bottom of your cooking surface. Next you are going to whip your egg and water together in a container big enough to place your steaks (one at a time) to coat them on both sides, from the egg you take that steak right into your bread crumbs (I like Panko the best) one it is good and coated place it in the skillet and on to the next steak! With a temperature about 300 or so it will take a few minutes on each side.  You can check when to flip when the bread crumbs create a beautiful golden brown crispy deliciousness. Flip over and cook the other side a few minutes more and then pull out.
As a side not if your steaks are over ¼ inch thick and you do not like pink in your meat you will need to cook these longer to cook all the way through. However, you need to be careful not to burn your crust before you achieve your desired doneness level. This is why I like the cube steak; it cooks rather quickly without problems of burning the crust.
(After I flipped the fisrt one - to show the coloring)

Now I cheat a bit and use a packet of country gravy mix to put on top. Serve these beautiful steaks with cornbread or mashed potatoes and some veggies and a super quick and easy dinner on your table in no time!   

Tuesday, July 3, 2012

"Rob made Pot-stickers!"


Hello, my peeps.  ...or, a ...Becky's peeps.  Anyway...

Here's what happened:

We had these won-tons that Becky ended up not using in another recipe.  Plus, we had all these other ingredients at home, so I volunteered to make potstickers.  After all, they're yummy, and my buddy, Josh, had made pot-stickers before and said that it wasn't too hard and that I should try to do it myself sometime.  Well, I did, and Becky & Barbara can't stop eating or raving about them.  All I did was look up a couple recipes online for some pointers, and then (of course) I did my own thing, which was this:

Yummy! Ready to Serve!

Rob's Pot-stickers


1.25 lbs ground turkey
1.5 cups of whole leaf young spinach, finely chopped
3/4 cups finely shredded carrots
1 small onion, finely chopped
2 cloves fresh garlic, finely chopped
1 egg
2 tablespoons finely chopped red bell pepper
1 Tablespoon sesame oil
2 teaspoons ketchup
1 teaspoon Worcestershire sauce
1/2 teaspoon black pepper
1/4 teaspoon ginger
5 shakes Szechuan pepper
3-4 shakes of cayenne pepper (coulda used more, I think)
3 shakes Chinese 5-spice

Watch out!!  Raw meat involved.
You'll also need:
1 12oz package won-ton wrappers
Water, to seal the won-tons
Coconut oil (for frying)
1.25 cups chicken broth


The following process takes a bit over an hour.


Directions:

The one I'm preparing here has
too much meat mixture.
  1. Mix the first list of ingredients (from the turkey to the Chinese 5-spice) in a bowl until evenly mixed.
  2. Drop a little less than a tablespoon onto a won-ton wrapper.
  3. Wet the edges of the wrapper with water, and press them together.(Repeat until you run out of meat mixture or won-tons.)
  4. Coat the bottom of a large frying/sauce pan on medium heat.

  5. Repeat the following steps until all the won-tons are cooked.
  6. Place several potstickers in the pan, leaving room to turn them over.
  7. Cover and cook for 90 seconds, or so.
  8. Turn them over, and cook for another minute
  9. Add a quarter cup of chicken broth.
  10. Cook uncovered for one more minute. (Total time in pan is 3.5 to 4 minutes.)
  11. Breifly rinse and scrape the pan out, and place it back on the stove.
  12. When dryish, add bit more coconut oil, and cook another batch.

Brown on one side, flip, brown, add broth.  These are spaced a bit too closely.
Then Eat.  ...and eat.  ...and eat.

Asian Chicken Noodle

So, a lot of times, you may see a recipe that looks pretty plain, or sounds pretty plain, and that's what I thought about this one when I first saw it in Jamie Oliver's cookbook. But  I finally gave it a try cause it said it was quick, and I was blown away by the flavor. So, if you're going to try at least one of my recipes, try this one. It's been picky eater approved.

Asian Chicken Noodle, adapted from Jamie Oliver's Jamie Oliver's Food Revolution

Ingredients
Olive Oil
Ginger
Chinese Five Spice Powder
Szechuan Pepper
Onions, diced
Carrots, thinly diced
Chicken, chopped
Chicken Broth
Snow Peas
Bell Pepper (Choose your color), chopped
Rice Vermicelli (Thin Rice Noodles)
Spinach
Sunflower seeds, Poppy Seeds, Seasame Seeds
While you see salt on the oven, I didn't use it.


1. Put a skillet or wok with some oil olive on the oven at medium high heat
2. Once the oil is heated, put in your onions and carrots, and ginger. This is the stage where I also put in a pot on the stove with water for the rice noodles. Put in some salt, and watch the pot for boiling.
*Rob prefers his carrots to not be crunchy, so I cook this for a little longer than normal. You obiviously, will choose your own path.
3.  Before I add the chicken, I put in a lot of the Chinese Five Spice and a little less of the Szechuan Pepper.
4. Add chicken, cook until it is no longer pink, only white
5. Add chicken broth, let cook for a few minutes
6. Add snow peas, bell pepper, let cook for a few minutes.
7. Typically the water has boiled now. When the water is boiling, put in the rice noodles, however they cook very quickly, so keep your eye on them.
8. When the rice noodles have cooked, put them in a strainer, and allow to cool a moment. Add to skillet.
9. Add spinach and seeds.

You may now serve your dish! I would suggest using a bowl to serve them in. Also notice how full your skillet is. This is a hardy meal!


Cajun Chicken and Red Beans and Rice

I wouldn't say I've had much experience with Cajun food. In fact, I've had very little. I'd say the only thing that makes this remotely "Cajun" is the fact that I bought a seasoning mix at Penzey's called "Cajun Seasoning." So there you go, it's 100% legitimate.

Cajun Chicken
Chicken, diced
Salt
Cajun Seasoning (I really like the one at Penzey's)
Black Pepper
Diced Onions
Lemon Juice
Olive Oil

1. Heat oil in a skillet on medium high heat.
2. Put in onions to cook for a while
3. Season chicken with Cajun Seasoning, a little Salt, and black pepper
4. Cook chicken until there is no more pink

Red Beans and Rice (While Chicken is Cooking, or Start Before)
Kidney Beans, drained and rinsed
Carrots, really diced
White Rice
Chicken Bullion Cube
Cajun Seasoning
Red Bell Pepper, really diced

If you have a rice cooker:
1. follow typical directions, only add one cube chicken bullion, a TBSP cajun seasoning, and the carrots.
2. Add the beans and the bell pepper after it finishes cooking.

If you do not have a rice cooker, follow rice directions on packages, only subsitiuting chicken broth (having dissolved your bullion cube in water) for water. Add beans and bell pepper when finished.

The feedback on this one was pretty positive. Rob said I should make it every four weeks, and that was really a compliment. If you have any cajun recipes, send them my way, because my first try had some great results.

Wednesday, June 27, 2012

The Red Velvet Revolution

Sometimes when I hear people gushing over Red Velvet Cake, Crackers, Bars, etc,  and they say things like "Red Velvet! How decadent!" I can't help but think "You're lying to yourself! It's only yellow cake with a tablespoon of coco powder and red dye!"

There I said it.

Chocolate Cupcake Experiment 1

I've decided one of my life goals is to make a delicious, white sugar free chocolate cupcake. This happened about two weeks ago when I made some cupcakes with Josh, and they were delicious. And they were gluten free. Not only were they gluten free and delicious when they came straight out of the oven, they were just as good the day after. Then I went to one of my favorite restuarants, known for their desserts, and spent 3.75 on a chocolate cupcake. I had a bite, and I thought to myself that the frosting was amazing, but that I felt I had made something a week before that was very similar to this fancy cupcake.

And *Poof*! The idea was born. Why should I let the bakeries have all the fun? Why can't I make a really, really, really good cupcake at home? Why can't I make a gluten free cupcake that tastes good, and doesn't have white sugar? (I'll post maybe some health related links on sucrose and fructose, maybe...) So, here are the results from experiment numero uno!

This Recipe is adapted from the cookbook Chocolate Cakes by Elinor Klivans. 

1 CUP Gluten Free Pantry All-Purpose Flour (This is a good one so far)
1/4 CUP UNSWEETENED Hersey's Special Dark DUTCH-PROCESS COCOA POWDER
1/2 TSP BAKING SODA
1/8 TSP SALT
1/4 CUP SALTED BUTTER (ROOM TEMP) *Salted is just what we had, oh well*
1/2 CUP CORN SYRUP
2 TBSP XYLITOL
2 TBSP Honey
2 LARGE EGGS
1 TSP VANILLA EXTRACT (ESSENCE)
1 CUP BUTTERMILK

1 CUP CHOCOLATE CHIPS
2 CUPS GANACHE, COOLED TO SPREADING CONSISTANCY

Preheat oven to 350.
1. Cream butter for a minute. Add Xylitol, cream.
2. Add corn syrup, and honey until smooth.
3. Add eggs one at a time, blend until smooth.
4. Add vanilla, blendn until smooth.
5. Put dry ingredients in a sifter.
6. Alternately add buttermilk and dry indredients. Start and end with buttermilk.
7. Add chocolate chips, stir in.
8. Pour into muffin pans, pour until each cup is 3/4 full.
9. Backe for 20-25 minutes based upon your oven. Cupcakes are done when insert a toothpick and it comes out clean.
They look really good, don't they? Lies! Well, they were really good when they first came out.


I know what you're thinking, "Corn syrup?! That's not healthy!" Well, unless I'm mistaken, and I could be, Corn Syrup or Glucose Syrup is different than High Fructose Corn syrup. High Fructose Corn Syrup is the dangerous one, and it shares some similarities with white sugar. Regular Corn Syrup is very low on Fructose, and actually not all that sweet.

Now for the ganache, which I royally blundered:

2 cups Heavy Whipping Cream
1 TBSP butter
A whole bunch of chopped chocolate
1 TSP vanilla
I don't know what I did wrong, but doesn't it look pretty? Lies!

You're supposed to slowly heat the cream with the butter, so that it doesn't form a skin, but that it melts the butter. Once it reaches about 175, and has tiny bubbles, you're supposed to take it off the oven, let it cool for half a minute, and then pour in the chocolate chips, and whisk it all together. Then whisk in the vanilla. Then let it to set for a half hour, and then frost the cupcakes.

I don't know what I did wrong, I only know that something seperated. So if it looks grainy in the pictures, that's probably because that's the seperation. I think we even tried to add cornstarch to fix what we had done, maybe that did it?

Special Note: I have been baking with Jacque Torres 60% chocolate, and it is very good chocolate. Pricey, but it's good. I'll post our chocolate contest later.

The verdict: It tasted great out of the oven.
Two days later: The frosting is chocolatey, the cupcake is a little dry, and it's time to go back to the drawing board.

A Song lyric comes to mind about the frosting, "Gotta Keep Em' Seperated"

Next experiment: Sour cream?

Tuesday, June 26, 2012

It doesn’t get much easier than a Homemade Honey baked Ham!

After feeling pretty tired all day (my norm these days) my sweet husband took the kids for a walk so I could take a nap. I woke up at 6:15 thinking if I don’t get dinner on the table soon we won’t be eating until midnight. So tonight’s dinner was ham and potatoes and the longest part of the process is the potatoes.

The potatoes I am cooking are your standard casserole potatoes (also known in my book as funeral potatoes)
2 cans cream of chicken soup

8oz Sour cream (~1/2 normal container) – I use reduced fat but use whatever works for you!
Green onion (however much you like)

~ 8 oz cheddar cheese
1 bad shredded frozen hash browns (~2lb)

***(Can you see I am really not much of an exact measurer!!!)***
Throw the first 3 ingredients  into a pot and heat until warm and bubbly at that point add  ¾ of your cheese and let heat until it is all melted and incorporated! Slowly add the hash browns and stir them until all mixed together. After it looks like a delicious mess dump into a large casserole dish and spread around till even. Top this wonderfulness with the rest of your cheese and place in a pre heated 375° oven for about 45 minutes or until hot and bubbly and you don’t want to wait anymore!

That was the hard part! On to the Honey Baked Ham!!!
My husband always asks when I cut up ham if it is precooked! As a general rule of ham, if it is pink and smells like you would want to eat it already it is precooked! We generally will buy small loafs of Ham in the meat section of the Grocery store they typically are NOT precut and are in about 2 lb packages!

For the Ham you will need a HAM cut into pieces no thin then ¼ inch and really not thicker then ½ inch. Really what you want is them cut as even as you can managed just so they cook (warm through) evenly! The only other thing you need is Brown sugar and Honey!
Cut the ham and put in a baking dish! (I ended up using ¾ of my ham because I used a tiny baking dish) It is ok if they over lap a little but you don’t want them completely covering one another! When all the ham is in there sprinkle on some brown sugar for my small baking dish I used 3 Tablespoons. Then take your honey and lightly squeeze a drizzle all over your ham and brown sugar! Remember this is a light flavoring not a main star so go light on the sweeter stuff, I always find it easier to add then take away!

Stick it in the same oven your potatoes are working in let them go! They will be down about the same time. If you have small children or a picky husband who like his veggies then you could make a veggie and if you are a bread lover like me feel free to add some rolls or what not (roll recipe to com e in the future) But it is all delicious so ENJOY!


(Dinner working away in the oven)

Sunday, June 24, 2012

Apple Pie

Apple Pie – 1 pie


1 cup sugar
2 tablespoons flour
1 teaspoon cinnamon
1/8 teaspoon nutmeg
¼ teaspoon salt

Thoroughly mix all that together in a bowl.  A fork works well. 

7 cups (about 6 apples) green Granny Smith apples
2 tablespoons lemon juice.
Butter

Peel, pare and thinly slice apples.  Sprinkle with lemon juice (keeps apples from turning brown).  Toss apples with sugar/cinnamon mixture.  Put mixture into pie crust shell and dot with a few pats of butter.  If you want to, put a couple of drops of almond extract flavoring.  That was always my mom's secret ingredient, besides the heaping helping of TLC. 

Dampen bottom pie crust edge.  Put top pie crust on, pressing edges together and fluting so the juices won’t bubble out during baking and cut a few vents into the top crust to allow steam to escape. 

Bake at 425 degrees Fahrenheit for about 45-50 minutes.  (Use the rack that will position the pie in the middle of the oven – horizontally and vertically.)  This pie can get bubbly and juicy so I put a cookie sheet below it to catch any drips. 

Saturday, June 23, 2012

Herb and the Gang, the Survival Band

This blog was never intended to be only recipes. I had hoped to include other activities that involve the home life. This blog should basically be anything DIY.

So then, let me tell you about a little band I put together, and it's called: Herb and the Gang. Herb and the gang is my continuous attempts at making a container herb garden.

The Story of the Original Herb and the Gang:
I bought the first band at Whole Foods, and this included:
Basil- who was named "Herb"
Oregano
Thyme
Lavender

For one reason or another, they died a horrible death. I think I have a black thumb. The funny thing was, that I tried to pull an exile on them, and left them out in the sun to starve and die (I'm a herbicidal maniac I know.) and they all withered and turned brown. I was very sad, until a few weeks later we noticed that Basil, or Herb, had somehow survived the herbicide. So, I created the "Revival Band."

The Story of Herb and the Gang, the Revival Band
I bought replacement herbs at a local nursery, with Herb as the original band member. The band included:
Basil- the Original Herb
Oregano
Thyme
Lavender


This time I think I was overly zealous, and over watered them. So then I would under water them to make up for it, and they started to die. I got desperate and believe that they needed more sunlight so I put them outside again, and then they contracted maggots.

So I gave up, for a period of time. Rob had mentioned that he would like a herb garden. I told him my stories of my garden woes, and he promised to help. So, here we are, with:

The Story of Herb and the Gang, The Survival Band.
It's going alright so far, I've posted the photos below. When do you think is the proper time to start harvesting? They grown quite a bit since we've first got them, but I'm a little nervous to start snipping away.

Here is Oregano and Rosemary
Rosemary is looking a little wonky. Any suggestions on how to straighten her up?

Here is Basil (Herb) and Thyme
I was holding up Basil for this photo as well, any ideas on how to set my herbs straight?


Refrigerator Crescent Rolls - Potato

Refrigerator Roll Dough – Potato Crescent Rolls

1 package active dry yeast
1½ cups warm water (105-115 degrees)
1 cup unseasoned lukewarm mashed potatoes
2/3 cup sugar
2/3 cup shortening
2 eggs
1½ teaspoons salt
6-7 cups all-purpose flour

Dissolve yeast in warm water in large bowl with about a teaspoon of sugar.  Watch to make sure the yeast is active.  Stir together mashed potatoes, sugar, shortening, eggs, and salt.  Beat until smooth then combine with the yeast/water and beat well.  Beat in 3 cups of flour.  Mix in enough remaining flour to make dough easy to handle.  Turn dough onto lightly floured surface; lightly knead until smooth and elastic, about 5-10 minutes.  Place in greased bowl; turn greased side up.  Cover bowl tightly; refrigerate at least 8 hours but no longer than 5 days.

Roll ¼ of dough into 12-inch circle on floured surface.  Spread with melted butter.  Cut into 16 wedges (they will be quite narrow – 12 is less narrow).  Roll up tightly, beginning at rounded edges, stretching dough as it is rolled both width-wise and lengthwise.  Place rolls with tip points underneath on greased cookie sheet; curve slightly.  Brush with melted butter.  Let rise 1 hour.  Heat oven to 400 degrees.  Bake 15 minutes, until golden brown.

Friday, June 22, 2012

Introduction

Bienvenidos!

My name is Becky, and I wanted to start a blog. What this blog's main purpose is, is to spread good ideas that help make your home life better. I'm really starting this for selfish reasons. I'm surrounded by intelligent and talented cooks, and I want your recipes. I have friends who are into growing plants, making their own detergent, and their own cheese. I want to do that myself, without having to do all the heavy lifting in research that you've already done! But maybe I can benefit your lives too, add a little humor to your day, post a random recipe that you normally wouldn't think of. This should be a collaboration of intelligent minds, and me!

Please join me, and hopefully we'll all benefit from new ideas (insert gratuitous exclamation point here)!


Also, because the Internet doesn't have enough of this, here's my cat:
Toby the Cat
His name is Toby, but we call him "His Cuteness, the Toby" 
or "Toby Tobleson Earl of Fluffiness"


Be sure to check out my friend's blog:
Rick's Blog: Seasonal Baking

Our dinner tonight was Pomegranate Chicken Salad. (Adapted from Better Homes and Gardens Magazine, Nov 2009)


Ingredients
Oil Olive
1 Pomegranate
Some Chicken, In whatever form you cook with (adapt for how many mouths ye feed)
1 Cup Pomegranate Juice
2 Tablespoons Citrus-y Juice (Orange, Lemon, or Lime) 
1 Red Onion 
3 Tablespoons Red Wine Vinegar 
A Whole Bunch of Oregano (Or Basil)
Salt & Pepper to taste
Spinach, or a Mediterranean Mix of Greens
Your choice of Nuts, chopped, (Walnuts or almonds suggested)

*Epilogue* Prep your pomegranate by taking out the seeds. Prepare to blunder your way through. My kitchen looked like a small CSI scene with bright maroon splatters everywhere.

1. Heat olive oil in skillet.
2. Put the chicken in the skillet.
3. I put a lot of pepper and some dried onions in about now. I really don't know why.
5. Cook chicken, cut chicken.
7. Add oregano.
6. Add reds onions, pomegranate juice, citrus-y juice choice, and  Red Wine Vinegar.
7. Let juices reduce in lower heat.
8. Toss in greens with pomegranate seeds, and nuts.

I'm thinking that feta cheese would taste good with this. What do you think?
I found that the pomegranate sauce had a subtle flavor. I believe the salt, and citrus-y juices will help bring out the sweetness and give it a more power packed flavor.

All this is missing is the greens, and possibly  Feta Cheese. 


Becky, bloginator, blunderer, and alliterator extraordinaire